Monday, September 30, 2013

Homemade Layered Paratha

Yummy Layered Paratha (Roti Canai)


So a while ago I made my own Beef Rendang, from scratch. Took me about 45min to get everything prepared and in the pot, then about 2hours on the stove.  To save on time I skipped a few steps, like frying the onion and garlic and roasting the herbs and spices. I just rolled the meat in the spices and then chucked it in.

Most of it was eaten, but there was a small bowlful left, which wasn't enough for dinner the next day so I chucked it in a zip lock bag and froze it.

To make it extend a bit further and be enough for a meal for 2 and a half, I made some Roti Paratha's. Indian flat breads with lots of layers. These are super yummy and the method eluded me for years, i just couldn't make them right but through some trial and error I have FINALLY been able to make ones that rival the frozen store bought ones!!


Ingredients:
2 1/2 cups plain white four (you can use wholemeal flour BUT you won't get as many layers)
1 cup water
1 teaspoon salt - don't skimp on this or it won't work as well, I'm sure there is a scientific explanation but all I know is that like this, it works!)
about 1/2-3/4cup oil

Mix flour, salt and water together


It will be sticky, add a dusting of flour if you have to
but kneading it will help bring it together


Knead for at least 5min until you get a spongy ball of dough

Chop into 8 pieces. These are fairly large paratha's,
so you could do 10 or more if you wanted.

Pour some vegetable oil on your bench, this stops it sticking.
Roll out to a long rectangle. Using your hands, spread some oil over the dough.
Fold in half to form a square. Fold Agin to form a rectangle.

Fold again to form a little square. Roll out with a rolling pin,
make sure the rolling pin has a thin layer of oil so it doesn't stick.

8 rolled parathas

Fry in pan with a little oil to start with, don't add anymore oil after
the first one as there will be plenty of oil coming out from the paratha.

Once flipped, push down so it bubbles and the layers separate.

TA-DAH!! you have finished making your yummy paratha's, enjoy!!


Multi-Coloured Crayon Activity

DIY Multi-Colour Crayons

My Little Mr. A loves colouring in. He gets all sort of colour in things from his Granny and Nanna, but of course the little crayons snap, get lost and smooshed into the carpet. They are always under my couch, ALWAYS!! I had a smart idea to collect all the dud crayons and melt them together and TA-DAH!!! Multi Coloured Crayons!!! 

Its also a perfect dad-proof activity. Make your own Army Camo Print Crayons - Mr Dad loved this name!


Little Mr. A also has a new obsession with the Trash Packs, the picture behind can be downloaded from their website .

Target Areas and Skills Used:

  • Fine Motor Skills
  • Finger and Hand strength and endurance
  • Colour Matching
  • Counting

First, collect all the dud crayons. I also did another packet that we had lying around the house, it was mostly browns and orange, but it worked.
Extra crayons

I got Little Mr. A to take the paper off. Its great for finger strength and fine motor skills in preparation for writing before he starts kindy next year. Im going to try to incorporate AS MANY fine motor activities into his day as possible so he might like writing at school. So much of the time kids don't like writing because their hands fatigue and get sore. This is a great way to trick him into using his fingers! This cheap brand of crayons the paper was a bit tricky to take off, so i used my nail to take a strip of paper off and Little Mr. A was able to take the paper off easier. We used about 40 crayons, half were broken. 
Scratch a strip of paper off to make it easier for kids to un-wrap

We used a silicon mould. There are nice shaped ice moulds that would work nice too, my mum has a long thin silicon ice mould which would be perfect. I find the moulds very flimsy so i put it ontop of a baking tray. I told Little Mr. A that we could have 3 colours in each mould. He also had to snap up the crayons into smaller pieces to put into the moulds.
Choosing which 3 colours will look nice together

 I baked the crayons for about 30min at 75 degrees, the coolest setting in my oven. I didn't want to chance burnt crayon smell in my house! Little Mr. A is starting to learn the time so every 5 min had to check on the crayons, so if you keep the oven shut it should take alot less time.
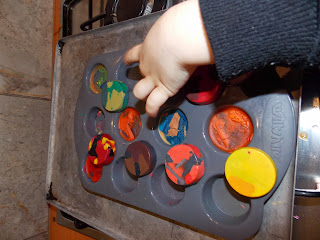
Crayons looking a little gross, melted but retaining their shape.  I jiggled them around a bit and poked the sticking up ones with a skewer. 

Crayons fresh out of the oven. The underside is the nice side!
Mmmm.....fresh crayons straight out of the oven!

And yes, as Little Mr. A pointed out, we have army print brown and army print green crayons!
"Look mum, army print!"


Little Mr A couldn't wait to try them out

All of our crayons. These would make great ideas for party bags, get the birthday boy (or girl) to do this with dad (come on, this has got to be dad proof right??) while you rush around like a mad man before the party!